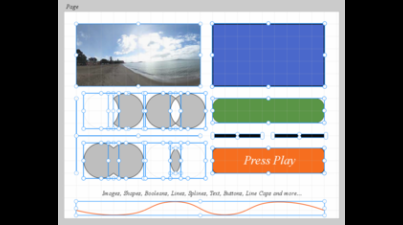
4D Paint
Compatible with R20, R21, S22.118+, R23.110+, S24, R25, S26, 2023 and 2024 on both OSX (Intel and M1) and Windows
Includes the following
-
4D Paint Brushes
- Realtime on-surface projection painting brushes to paint texture directly down onto your models in the main Cinema 4D viewports.
- Paint with stamps
- Paint with stencils
- Paint with symmetry
-
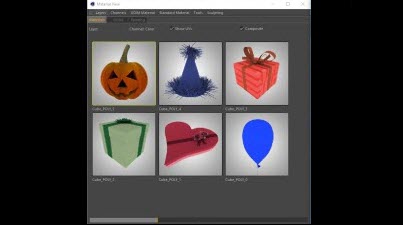
Material View
- Create new materials
- UV map uvs
- Transfer UVs, and the textures, to new materials
- Select edge uvs
- Transfer data from sculpt layer to textures
- Add channels and layers across multiple materials simultaneously for an object.
-
Layer View
- View and create layers using a photoshop style layout view.
-
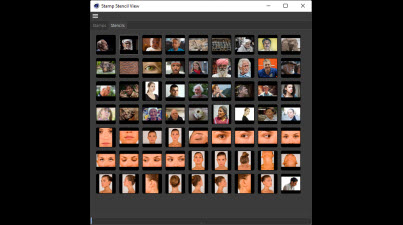
Stamp Stencil View
- A Stamps and stencils view based on set folders on disk.
- Works with painting and sculpting tools.
-
Texture View
- View multiple material textures, and their uvs, on the currently selected object.
-
Vertex Painter
- Paint vertex colors on your model using Stencils, Stamps, Symmetry and all the power of the sculpting system features.
- Vector Graphics
- Plugin Manager
Comes with Painting and Vector layouts
Full documentation can be found here.
Note: These plugins are no longer being actively developed and do not come with any support. They are just being compiled for new versions of C4D so that you can continue to use them.
As newer versions of C4D have come out, the compatiblity of some of the workflows may not work as well as shown in some videos. One example is that Maxon replaced the entire 3D viewports recently and sometimes the view doesn't update in some cases.
Even though there are some issues and quirks, there are still a few gems in these plugins that might be useful to you in your work.
C4D R17, R18 and R19 Owners
If you have R17, R18 or R19 then you can use the following link to get the free version
This edition is actually labeled as '4D Publish' and requires a license key that you will be emailed to you. It only contains the 4D Paint features however, it is not the full version of 4D Publish.
A Brief History
4D Paint started life as an experiment to see if I could create a painting system that uses the sculpting brush workflows and integrate that with the existing BodyPaint system.
Over time additional features were then added to allow for a UDIM workflow via the creation of the Material Manager. This allowed me to create multiple Standard materials and have a way to create layers over all of them for painting purposes. Later additional features to move UVs, and their texture, to different materials was also added.
Using the BodyPaint layers manager was always a problem because there was no way to easily determine what layer a user was actually trying to paint on. So a new Layer Manager was then created. This followed a visual Photoshop style way of displaying the layers and their textures. And selecting layers within the new layer manager allowed the painting tools to have much more flexibility since it now fully controlled the underlying layers system, instead of trying to guess what the user had selected within the BodyPaint interface.
Over time too many feature were added to this system and it has become a bit too complicated. It has way too many features now and can be quite confusing and a bit overwhelming for most people.
And since this product never gained any real attention with C4D users, there was no real market for it. Which is understandable given that C4D already has a painting solution as well as there being many other 3rd Party solutions that do an excellent job. So because of this all development of this project was stopped.
This system still works quite well, however it is not 100% perfect. But the tools are still useful for anyone who wishes to use them. And there are many workflows and tools within this bundle if you wish to dig around to see what's there.
This product is the culmination of hundreds of hours of development time over the past 5 years. As well as additional time spent on website development, tutorials, documentation, support and sales. All done because of a curiousity to see what could be accomplished using the Cinema 4D SDKs.
I highly doubt you will ever see an on-surface 3D Painting system within Cinema 4D any time soon. So if you are after a system that is similar to MudBox, 3D Coat, Substance etc... with brushes that can paint an image down onto your model, then this is it.
Overview
- Realtime on-surface projection painting brushes to paint texture directly down onto your models in the main Cinema 4D viewports.
- Paint with a sculpting style workflow to paint using stamps, stencils and symmetry.
- Lets you work in a UDIM style fashion
- Has new views to work with materials and bodypaint layers in a Photoshop style way
- Use the content browser with all sculpt based brushes to easily let you set your working stamp and stencil.
- Includes a faster vertex painting brush to let you paint smoothly over millions of polygons with no delays, as well as project stencil and stamps directly onto your vertex maps.
- Texture transfer and remapping features to move UVs from one space to another and keep all your painting detail.
- UV mapping tools
- Includes a vector graphics system for creating animated materials
- And a whole lot more
Tips
- If you are starting with a new scene make sure you save before painting. Also save it into it's own folder, since painting will create textures in a 'tex' folder next to the c4d file.
- When painting on an existing model that has textures, make a copy of it first, including it's textures. Just in case you want to revert back later.
- If you are loading a file from disk that already has textures then on the 'Layer View' press the 'Paint All' button before you start painting. That will ensure all textures are loaded into C4D ready to actually be painted on.
- If you have multiple materials (ie from imported UDIMs) and you want to add a layer to all of them, then in the 'Material View' choose 'Layers->Add Layer To All Materials'. Then select the layer on the 'Layer View' before you start painting.

Preferences and Layouts
-
Under Edit->Preferences you will find a “Plugins 4D” section. From here you can set the settings for all the 4D Paint tools
- In Samp Stencil View you can set your stamps and stencils folder locations
- In Material View you can specify your default texture resolution when creating new channels and layers.
- Make sure to install the layouts from the Zip file into your Cinema 4D/library/layout folder.
Paint Brush Tutorials
There are a number of paint brush tutorials that were created back for the initial release of R17. While it is recommended to use the new Material View and Layer View, many of the workflows in these older tutorials are still valid for the current paint brush.
- When working with this system it is recommended to select the layer you wish to paint on via the 'Layer View'. Since I can tell C4D what to paint on, but the BodyPaint interface can't tell me what you have selected, if you get my meaning.
- Also make sure you have pressed the 'Paint All' button on the 'Layer View' before you want to paint on your materials, this sets up a few things in the background.
- Lastly make sure you are working with a file that is already saved to disk, so that it can also write out textures to the same location.
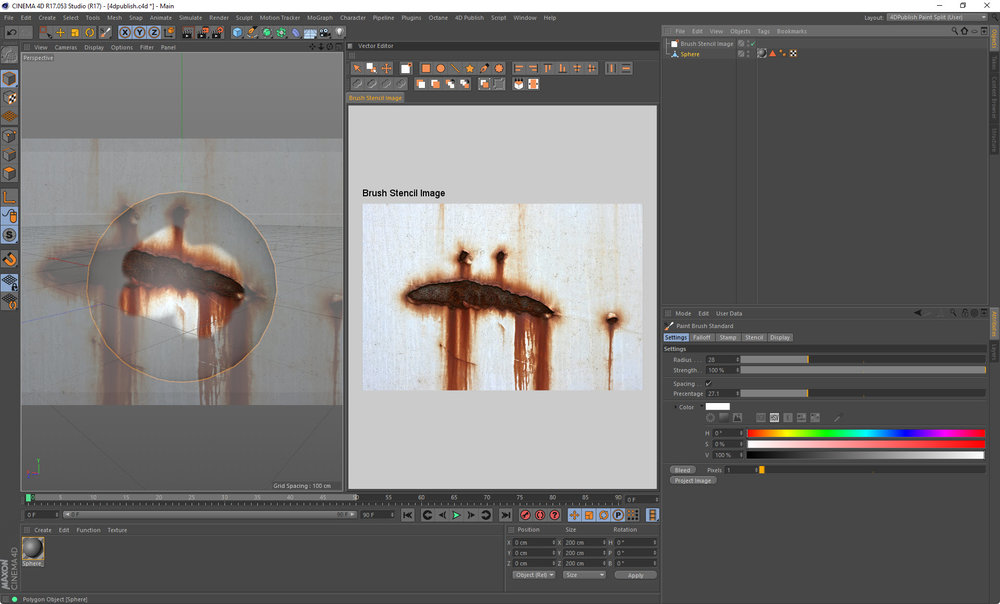
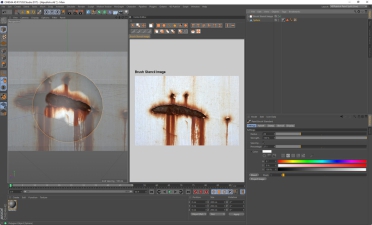
Real-Time Projection Painting
Paint directly in the OpenGL Viewport onto Polygon Objects. Each brush dab is projected down onto the surface of the object with the paint being applied to the currently selected Layer in BodyPaint. You can paint using the currently color set in the BodyPaint UI or directly apply Stencils or Stamps. You can also use all the Sculpting Symmetry abilities to ensure your painting is symmetrical.

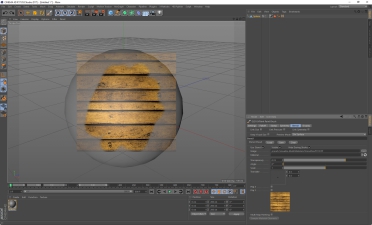
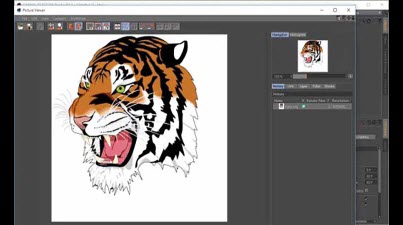
Use Stamps
Paint onto your models using Stamp images. Change the Dab Spacing to apply stamps at regular intervals on your model. Use PNG images with an alpha channel to get just the right shape and look. Use any Cinema 4D Material as a stamp, allowing you to use all the procedural shaders and noises for painting.
Use Stencils
Paint stencils down onto your models. By painting on a stencil it will project the stencil directly down onto the model, including symmetry. Also use the rectangle and poly modes to project a larger area of the stencil down onto the model. Use any Cinema 4D Material as a stencil. Allowing you to use all the procedural shaders and noises for painting, including multi-channel painting and Allegorithmic Substances.
Supports Symmetry
Use all the power of the Sculpting Symmetry settings to also paint onto your models symmetrically.
Paint over Multiple Materials
Paint a single brush stroke over Multiple Materials. Each material can have its own selected Layer in BodyPaint and the paint information will be projected onto each of the correct layers for each Material. Including when multi-channel painting.
BodyPaint Integration
When painting the brush will project down and place the texture onto the selected Layer in BodyPaint, for the material being painted on. If you have a Mask selected then it will paint directly into the Mask.
Paint Multiple Channels At The Same Time
Like other BodyPaint brushes you can enable the Multi Mode and if you have Multiple Channels enabled in BodyPaint then it will paint into each of the channels using the selected color for each specific channel. If you are painting using a Stamp or Stencil then it will place the same Stamp or Stencil color detail into every channel.
Use BodyPaint Channel Colors
The paint brush will use colors specified for each channel in BodyPaint. You can select each channel and set a different color for each one and the Paint Brush will correctly get and use these colors. Easily switch between the background and foreground color, specified on each channel, by holding down the ctrl key.
Project Stencils using Fill Tools
Using the Rectangle or Poly Fill modes you can select an area of the Stencil that you would like to project down onto your model.
Fill UV Islands with Random Colors
To get a feel for the texture on your model a one click button is included on the brush that will fill each of the UV Islands with a random color and apply this to the selected layer in BodyPaint.
Flood Fill
A quick one click button to flood every UV Island with the currently selected color. This could be thought of as a flood fill button but with the exception that it doesn't paint the entire layer, only where the UVs are on the layer. This feature also respects the Selected Polygons when in Polygon Mode. In this case it will just fill only the UVs for those selected Polygons.
Respect Polygon Selections
Restrict your painting to just the selected Polygons when in Polygon Mode. Selections will also be used when using the Fill Button to fill all the UV Islands.
Quick Fill Polygons With Stencils
A special option to simply flood fill every polygon that the brush touches. This allows you to quickly block out areas of your model with color or, when using Stencils, it will project the Stencil onto the whole polygon in one go. The brush will also respect the Pressure value.
Edge Detection For Filling
Edge Detection has been included to allow filling parts of the model based on its curvature/flatness.
Materials as Stencils and Stamps
By using a Material as the Stencil or Stamp you can projection paint any procedural Material directly onto the surface of your model.
Sculpt And Paint at the Same Time
You will also get a brush that is capable of sculpting and painting at the same time. This feature is a bonus experimental feature that will get more updates in future releases.
Paint Texture for Relief Object
Some objects, such as the Relief Object, can use textures. The paint brush has some update options to allow you to tell C4D to update the objects after, or during a stroke, while you are painting on a texture. This allows you to see real time updates of the Relief Object in the viewport as you paint on a proxy texture. See the videos for more details.
Paint Over and Fixing UV Seams
Fix up any seams you have painted over with the quick Bleed option. This will bleed out any texture from your UV Islands out into texture space allowing you to fix up any seams after you have painted.
Sculpt using a Displacer
Paint directly onto a Polygon Object and alter the texture used for the Displacer Deformer. Together with the real-time updates you can now do basic sculpting by texture painting directly on the surface of an object.
Mix Surfaces using a Fusion Shader
By painting directly onto an image in a Mask Channel on a Fusion Shader you can blend between 2 different Surface Textures.